

Quality Control and Trimming of NGS sequences
NGS Quality Control Tutorial: Understanding QC
This tutorial is intended to understand basic NGS statistics (mainly obtained with FastQC), and some of the steps required to fix or ameliorate some of the issues. Most of the information of this tutorial have been partially taken from the FastQC documentation available here.
Objectives / learning outcomes:
At the end of this tutorial you shoud be able to:
- Understand the QC statistics used in FASTQC
- Identify problems in NGS datasets
- Remove adapters and primers
- Make simple quality trimming for reads
This tutorial assumes that you have a basic knowledge in bash, and that you have an account and know how to connect to the Compute Canada clusters. If you dont, I reccomend you go over the BASH tutorial and you read the Compute Canada documentation.
Outline of the tutorial
- To start: A couple of things we need before we start the tutorial
- Getting the statistics with fastqc
- Basic Statistics
- Per Base Sequence Quality
- Per tile sequence quality
- Per sequence quality scores
- Per base sequence content
- Per sequence GC content
- Per base N content
- Sequence Length Distribution
- Sequence Duplication Levels
- Overrepresented sequences
- Adapter Content
- Running FastQC in the paired file
- Resolving some of the Issues
- Trimmomatic: remove adaptors and quality trimming
- Cutadapt: removing primers
- Seqkit: removing duplicates
To start
To start, let’s download this file to your account in Compute Canada. Also, load the following modules fastqc:
module load fastqc/0.11.5
module load trimmomatic/0.36
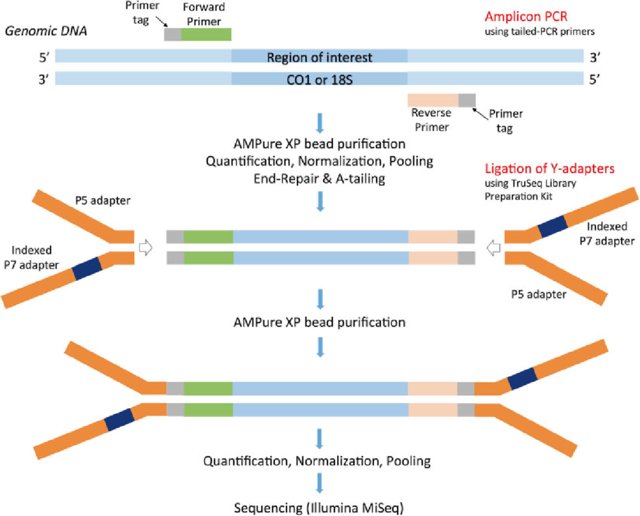
The file you downloaded is a real dataset from eDNA water samples. It is amplicon sequencing of a fragment of the 12S gene using Illumina’s Nextera Libraries in paired end sequencing mode. The PCR amplification should have an average length of 163-185, however, is highly variable due to the multi species composition of the sample.
Getting the statistics with fastqc
The statitics of any fastq file is easily obtained by the fastqc program. This program inludes a set of statistical test and modules to test for quality. From their README file:
FastQC is an application which takes a FastQ file and runs a series of tests on it to generate a comprehensive QC report. This will tell you if there is anything unusual about your sequence. Each test is flagged as a pass, warning or fail depending on how far it departs from what you’d expect from a normal large dataset with no significant biases. It’s important to stress that warnings or even failures do not necessarily mean that there is a problem with your data, only that it is unusual. It is possible that the biological nature of your sample means that you would expect this particular bias in your results.
So let’s run it!:
fastqc file1_R1.fastq.gz
This must have created an html file as well as a zipped folder. Use rsync, scp, FileZilla, or your favorite file transfer protocol to get the html to your own computer, and open it in a browser.
Basic Statistics
This table will give you basic information about your reads:
- Filename: The name of the file being analyzed
- File type: The type of information the file contains
- Encoding: How are the quality scores encoded
- Total Sequences: umber of reads in your file
- Sequences flagged as poor quality: Number of sequences with very low quality thoughout
- Sequence length: Average sequence length
- %GC: Percentage of GC content
For our file we get:

Encoding
Encoding is the way the quality of the bases are written. There are many encodings, but the most popular are Sanger, Solexa, Ilumina 1.3+, Illumina 1.5+, and illumina 1.8+. In summary, is a character that represents the confidence you have in a given base call.
 For more information check https://en.wikipedia.org/wiki/FASTQ_format#Encoding
But what does a quality score means? It s related to the probability of an error: |Phred Quality Score |Probability of incorrect base call|Base call accuracy| |— |— |— | |10|1 in 10|90%| |20|1 in 100|99%| |30|1 in 1000|99.9%| |40|1 in 10,000|99.99%| |50|1 in 100,000|99.999%| |60|1 in 1,000,000|99.9999%|
As a rule of thumb a Phred score above 20 (99% chances to be right) is considered acceptable and above 30 (99.9% chances to be right) as good.
I am not going to enter the rest of the basic statistics since they are self-explanatory.
Per Base Sequence Quality
It’s name is self explanatory. This module evaluates the quality at each base for all reads. FastQC gives you a box plot of the qualities, representing the inter-quartile range (25-75%) (yellow box), the extremes 10 and 90th percentiles are represented by the whiskers, the median value by a red line, and the mean quality by the blue line.

From the documentation of this module:
Warning
A warning will be issued if the lower quartile for any base is less than 10, or if the median for any base is less than 25.
Failure
This module will raise a failure if the lower quartile for any base is less than 5 or if the median for any base is less than 20.
Look at the figure above. What do you think is happening at the end? why?
Per tile sequence quality
This a feature that is exclusive to Illumina technologies. Their flow cells typically have 8 lanes,with 2 columns and 50 tiles:
 Courtesy of http://zjuwhw.github.io/2016/08/13/Illumina_sequencer.html
When systematic error occur in a tile, it can indicate sequencing error such as bubbles, smudges, or dirt. When the errors occur very sparsely and not too widespread, is often OK to overlook this error. When a full lane has a problem, oftentimes is a sequencing error and this cannot be fixed with bioinformatics. The problem can occur as as well when the flowcell is overloaded.
In our case we have:

Not the best quality, but there is no systematic bias… we might be able to fix this with some quality trimming.
From FastQC documentation:
Warning
This module will issue a warning if any tile shows a mean Phred score more than 2 less than the mean for that base across all tiles.
Failure
This module will issue a warning if any tile shows a mean Phred score more than 5 less than the mean for that base across all tiles.
Per sequence quality scores
This module allows you to explore if a significant portion of your reads are of poor quality. Often times warnings occur when your sequence is shorter than your read length, and therefore the end of reads (or the end of the flowcell) is of poor quality.
From FastQC documentation:
Warning
A warning is raised if the most frequently observed mean quality is below 27 - this equates to a 0.2% error rate.
Failure
An error is raised if the most frequently observed mean quality is below 20 - this equates to a 1% error rate.
This is the case for our File1:

Can you explain the figure above?
Per base sequence content
This module shows the proportion of bases in each position. In an unbiased library, the proportion of A, T, C, G, should run parallel to each other. If there is a bias, this could imply that the primers or adaptors were not remove, and therefore there would be a strong bias towards a certain composition. It could also mean that you have an over-fragmented library, creating over-represented k-mers, or a dataset that has been trimmed too aggressively. In amplicon sequencing, there tends to be biases in the composition of the given amplicon, especially when dealing with mitochondrial DNA.
From FastQC documentation:
Warning
This module issues a warning if the difference between A and T, or G and C is greater than 10% in any position.
Failure
This module will fail if the difference between A and T, or G and C is greater than 20% in any position.
Let’s take a look at file1:

What can you tell about this file?
Per sequence GC content
This module intends to show the proportion of GC content in the reads. The blue line represents a theoretical distribution (Normal) of your observed data. Deviations from this theoretical distribution often implies contamination of some kind (adapter/primer dimers, multiple species in the run). FastQC assumes that you are analyzing a single genome, and therefore will issue a warning in multispecies libraries. From FastQC documentation:
Warning
A warning is raised if the sum of the deviations from the normal distribution represents more than 15% of the reads.
Failure
This module will indicate a failure if the sum of the deviations from the normal distribution represents more than 30% of the reads.
Common reasons for warnings
Warnings in this module usually indicate a problem with the library. Sharp peaks on an otherwise smooth distribution are normally the result of a specific contaminant (adapter dimers for example), which may well be picked up by the overrepresented sequences module. Broader peaks may represent contamination with a different species.
Let’s take a look at out file1:

How would you explain the two modes (double peak)?
Per base N content
Some sequencer technologies would produce an N when it cannot define which of the four bases it has confidence on based on the phenogram. Illumina does not produce this, and therefore the plot should be flat and the module should always pass.
From FastQC documentation:
Warning
This module raises a warning if any position shows an N content of >5%.
Failure
This module will raise an error if any position shows an N content of >20%.
Failure or warning in this module suggest that the sequencing should probably be repeated since a significant portion of your reads have no information in them.
Since our toy file is Illumina, it shows a flat line in the bottom of the figure:

Sequence Length Distribution
It self explanatory title describes well this module. It plots the distribution of sequence length for your reads. Illumina produces the same length throughout all the lanes, however, other sequencing platforms produce a distribution of them. This module can be safely ignore if you know that you are expecting a population of lengths in your reads. If you are using illumina and this module fails or gives you a warning, you should talk to the provider of the sequencing.
Our dummy file (since is illumina) behaves as expected:

Sequence Duplication Levels
This module allows you to see the level of duplication of your library. Ideally, the blue (total sequences) and the red (deduplicated sequences) should match. This would mean that you had a diverse library, and that each sequence has been sequenced in the proper depth. However, this assumes that you are working with a genome of single species, and therefore the warnings and failures of this module should only be worrysome then, since it will show a bias (i.e. PCR artefacts, resequencing parts of genome). In enriched libraries, you would expect some level of duplication, especially when this module only takes the first 50 bases and the first 100K sequences to run the tests. In amplicon sequencing, we expect some degree of duplication, and we should not be too agressive in cleaning this up.
From FastQC docs:
Warning
This module will issue a warning if non-unique sequences make up more than 20% of the total.
FailureThis module will issue a error if non-unique sequences make up more than 50% of the total.
In our file, we get:

Explain the figure above
Overrepresented sequences
This cool module shows you sequences that are present in over 0.1% of your total reads. The coolest thing about it is that it will run a search for common contaminants and report them. In a single species, diverse, uncontaminated library, you should expect not to have any overrepresented library.
Check your copy of the overrerpesented sequences in the html file. Here is a screenshot of the first par:

What can you tell me about it? How would you check if is OK or not? Do it!!!Overrepresented sequences
Adapter Content
Another self-explanatory module. Here, the most commonly used adapters are screened for. They are mostly illumina adapters (Universal, Small 3’ RNA, Small 5’ RNA, Nextera) and SOLiD small RNA adapter. From the docs:
Any library where a reasonable proportion of the insert sizes are shorter than the read length will trigger this module. This doesn’t indicate a problem as such - just that the sequences will need to be adapter trimmed before proceeding with any downstream analysis.
In our file:

Running FastQC in the paired file
Now, let’s download the pair or R2 file. Run FastQC and tell me what do you think about this second file. Compare it to the first one. What do you see?
Resolving some of the Issues
There are many programs to do QC, and many specific tools for each one. For now we are going to focus on a few popular programs.
Trimmomatic
This program does adaptive quality trimming, head and tail crop, and adaptor removal. You can check the documentation and download the program here. One of the advantages of trimmomatic is that it allows you to work with pair end sequences, retaining only matching pairs. Other advantage is that it allows partial and overlapping matches for the searching of adapters. Before we run the program, let’s check at some of the options. Here I am going to focus in pair-end reads, but it also works in single end:
Efficiency and format flags
This flags go before the invocation of the output/input files:
- -threads: this flag modifies the number of cpu threads that trimmomatic should use in the computations. A typical laptop computer have about 2 cores which should amount to 4 available threads.
-
[-phred33 -phred64]: this flags tells trimmomatic the encoding of the file (see above)
Change encoding option
If you want to read your file in one encoding and output it in a different one, this options are the ones you need to use:
- TOPHRED33: Convert quality scores to Phred-33
- TOPHRED64: Convert quality scores to Phred-64 This options (and all the following on CAPS) must go after the input/output files.
Cropping
Trimmomatic has several options that can be use simultaneously or not:
- LEADING: Cut bases off the start of a read, if below a threshold quality
- TRAILING: Cut bases off the end of a read, if below a threshold quality
- CROP: Cut the read to a specified length
- HEADCROP: Cut the specified number of bases from the start of the read
LEADING and TRAILING are adaptive cropping. That means that they will cut your read’s head and/or tail if they fail the specified quality. This differs from CROP and HEADCROP, which would cut at an specified length or specified number of bases respectively. For the latter two, the program will perform the cropping for all reads
Adaptive length filtering
Trimmomatic has the option MINLEN which will drop reads that fall under the specified length:
- MINLEN: Drop the read if it is below a specified length
Adaptive quality trimming
The SLIDINGWINDOW option allows you to trimm reads based on their average quality in a window:
- SLIDINGWINDOW: Perform a sliding window trimming, cutting once the average quality within the window falls below a threshold.
It takes two values like SLIDINGWINDOW:4:15 which means “Scan the read with a 4-base wide sliding window, cutting when the average quality per base drops below 15”
Adapter trimming
Finally, trimmomatic will take a file with the sequences of your adapters and will trimm them out. It follows the following call: ILLUMINACLIP:<fastaWithAdaptersEtc>:<seed mismatches>:<palindrome clip
threshold>:<simple clip threshold>. From their docs:
- fastaWithAdaptersEtc: specifies the path to a fasta file containing all the adapters, PCR sequences etc. The naming of the various sequences within this file determines how they are used. See the section below or use one of the provided adapter files
- seedMismatches: specifies the maximum mismatch count which will still allow a full match to be performed.
- palindromeClipThreshold: specifies how accurate the match between the two ‘adapter ligated’ reads must be for PE palindrome read alignment.
- simpleClipThreshold: specifies how accurate the match between any adapter etc. sequence must be against a read.

As can be seen in the figure, there are 4 possible scenarios that trimmomatic cover: A. Technical sequence is completely covered by the read and therefore a simple alignment will identify it. B. Only a partial match between the technical sequence and the read, and therefor a short alignment is needed. C and D. Both pairs are tested at once, hence allowing for “is thus much more reliable than the short alignment in B, and allows adapter read-though to be detected even when only one base of the adapter has been sequenced.”
The palindrome clip
threshold essentially tells how accurate the alignment of the adapters must be. This is the log10 probability against getting a match by random chance, and therefore values around 30 are recommended
Running trimmomatic
java -jar <path to trimmomatic.jar> PE [-threads <threads] [-phred33 | -phred64] [-trimlog <logFile>] <input 1> <input 2> <paired output 1> <unpaired output 1> <paired output 2> <unpaired output 2> <OPTIONS>
Try it out with our previous dataset! Show me the result of a fastqc on the trimmomatic results!
Name the output file1_R1_trimmed_1P.fastq.gz and file1_R2_trimmed_1P.fastq.gz for the paired results
Cutadapt
Cutadapt is an incredibly versatile tool to remove primers or in general oligos from the flanking regions of DNA. The user guide (which this tutorial is based on) is available here.
Installation
Cutadapt is based on virtual environments so it is better to have a local copy of it in your own home. To do so, type:
pip install --user --upgrade cutadapt
If you know what you are doing you can use your superuser privileges instead of --user. If you are in the compute canada clusters graham or cedar, first you have to load the module scipy-stack/2018b.
Now test if everything went OK, by asking it for help like this:
cutadapt -h
Basic Usage
First is important to notice the orientation and composition of the primers.
Adapter types
Cutadapt can handle different kinds of adapters. Below a table with the type and the command line usage, with link to cutadapts website:
| Adapter type | Command-line option |
|---|---|
| Regular 3’ adapter | -a ADAPTER |
| Regular 5’ adapter | -g ADAPTER |
| Anchored 3’ adapter | -a ADAPTER$ |
| Anchored 5’ adapter | -g ^ADAPTER |
| Non-internal 3’ adapter | -a ADAPTERX |
| Non-internal 5’ adapter | -g XADAPTER |
| 5’ or 3’ (both possible) | -b ADAPTER |
| Linked adapter | -a ADAPTER1...ADAPTER2 |
| Non-anchored linked adapter | -g ADAPTER1...ADAPTER2 |
Regular 3’ primers/adapters
 Figured adapted from [here](http://gensoft.pasteur.fr/docs/cutadapt/1.6/guide.html
Cutadapt first usage is to remove regular 3’ primers/adapters from your reads:
Dealing with 3’ primers, cutadapt uses the option -a, according to their docs:
cutadapt -a AACCGGTT -o output.fastq input.fastq
Assuming that your sequences are in input.fastq and are result of the amplification with the AACCGGTT.
Let’s assume that our sample was amplified with the primer pairs:
- Forward primer: GTCGGTAAAACTCGTGCCAGC
- Reverse primer: CATAGTGGGGTATCTAATCCCAGTTTG
what would be the cutadapt command you would need to cast?
See result here
cutadapt -a CAAACTGGGATTAGATACCCCACTATG -o output.fastq input.fastqcan you explain why?
Let’s now explore our files (the ones in the first part of the tutorial) with color zgrep:
zgrep --color=always "CAAACTGGGATTAGATACCCCACTATG" file1_R1_trimmed_1P.fastq.gz
zgrep --color=always "CATAGTGGGGTATCTAATCCCAGTTTG" file1_R1_trimmed_1P.fastq.gz
What do you see? Do the same for the R2 pair. Run cutadapt as before. What have cutadapt done?
The -a option of cutadapt will remove everything that comes after the 3’ adapter. Therefore, if the sequence you are looking for is actually at the 5’, you will essentially remove your amplicon. From cutadapt’s tutorial:
For example, assume your fragment of interest is MYSEQUENCE and the adapter is ADAPTER. Depending on the read length, you will get reads that look like this:
MYSEQUEN
MYSEQUENCEADAP
MYSEQUENCEADAPTER
MYSEQUENCEADAPTERSOMETHINGELSE
Use cutadapt’s
-a ADAPTERoption to remove this type of adapter. This will be the result:MYSEQUEN MYSEQUENCE MYSEQUENCE MYSEQUENCE
Regular 5’ primers/adapters
 Figured adapted from [here](http://gensoft.pasteur.fr/docs/cutadapt/1.6/guide.html
Regular 5’ adapters are normally not recommended.
Figured adapted from [here](http://gensoft.pasteur.fr/docs/cutadapt/1.6/guide.html
Regular 5’ adapters are normally not recommended.
Cut adapt will keep only things after the primer/adapter:
ADAPTERMYSEQUENCE
DAPTERMYSEQUENCE
TERMYSEQUENCE
SOMETHINGADAPTERMYSEQUENCE
All of the above will yield MYSEQUENCE, however, SOMETHINGADAPTER will be empty.
Repeat the same exercise as with the 3’ adapter
Anchored 3’ adapter
 Figured adapted from [here](http://gensoft.pasteur.fr/docs/cutadapt/1.6/guide.html
Anchored adapters occur at the beginning (5’) or the end (3’) of the read. 3’ anchored adapter removal is seldom used, since oftentimes you can have information coming after the 3’ adapter. However, it can be useful when the reads have been already merged and therefore we don’t expect any real sequence after the adapter. To anchor the 3’ adapter, we use a
Figured adapted from [here](http://gensoft.pasteur.fr/docs/cutadapt/1.6/guide.html
Anchored adapters occur at the beginning (5’) or the end (3’) of the read. 3’ anchored adapter removal is seldom used, since oftentimes you can have information coming after the 3’ adapter. However, it can be useful when the reads have been already merged and therefore we don’t expect any real sequence after the adapter. To anchor the 3’ adapter, we use a $ at the end of the adapter sequence: -a ADAPTER$. It will work as follows:
MYSEQUENCEADAP
MYSEQUENCEADAPTER
MYSEQUENCEADAPTERSOMETHINGELSE
will result as:
MYSEQUENCEADAP
MYSEQUENCE
MYSEQUENCEADAPTERSOMETHINGELSE
Anchored 5’ adapters
 Figured adapted from [here] (http://gensoft.pasteur.fr/docs/cutadapt/1.6/guide.html
This is the more usual usage of the 5’ trimming of adaptors, since we expect our read only to start AFTER our 5’ primer. To use it we invoke the -g as before, but add a ^ in front of the adapter: -g ^ADAPTER. We will get something like this:
BADAPTERMYSEQUENCESOMETHING
ADAPTERMYSEQUENCESOMETHING
ADAPTMYSEQUENCE
ADAMYSEQUENCE
after -g ^ADAPTER will render:
MYSEQUENCESOMETHING
MYSEQUENCESOMETHING
MYSEQUENCE
MYSEQUENCE
Note that cutadapt allows for some errors. They call them insertions and deletions. If you are sure that your adapter is intact, you can disable this tolerance for error with --no-indels.
Non-internal 5’ and 3’ adapters
A less strict version of anchored trimming, where the adaptors have to be at the end of the read, but partial occurrences are allowed. To make use of these, we add the prefix (for 5’) or suffix (for 3’) X. For 3’ non internal adapters we can use -a ADAPTERX, and we will expect:
| Input read | Processed read |
|---|---|
mysequenceADAP |
mysequence |
mysequenceADAPTER |
mysequence |
mysequenceADAPTERsomethingelse |
mysequenceADAPTERsomethingelse |
For 3’ non internal adapters we can use -a ADAPTERX, and we will expect:
| Input read | Processed read |
|---|---|
APTERmysequence |
mysequence |
ADAPTERmysequence |
mysequence |
somethingelseADAPTERmysequence |
somethingelseADAPTERmysequence |
Linked adapters (combined 5’ and 3’ adapter)
If you are sure that your amplicon is framed by BOTH primer/adapters, and that the read contains them both, you can provide both adapters with the linked adapters option -a ADAPTER1...ADAPTER2. Adapter1 is an anchored 5’ adapter while the adapter2 can be either anchored or not. If you want to make sure that both adapters are present exactly at the ends of the fragment, then you can required a linked adapter with the 3’ side anchored like -a ADAPTER1...ADAPTER2$.
From cutadapt documentation:
As an example, assume the 5’ adapter is FIRST and the 3’ adapter is SECOND and you have these input reads:
FIRSTMYSEQUENCESECONDEXTRABASES
FIRSTMYSEQUENCESEC
FIRSTMYSEQUE
ANOTHERREADSECOND
Trimming with
cutadapt -a FIRST...SECOND -o output.fastq input.fastqwill result inMYSEQUENCE MYSEQUENCE MYSEQUE ANOTHERREADSECOND
This one can be particularly useful when you have your reads merged and your amplicon is framed between the two adapters.
Using the -a option with linked adapters will always give you an anchored 5’ adapter. However, you can relax this restriction by using it with the -g option: -g ADAPTER1...ADAPTER2, in which case neither of the adapters act as anchored, but both MUST be present with some degree of tolerance.
MORE ADVANCED OPTIONS
There are plenty more advanced options, but we arent going to cover them in this tutorial. I encourage you to check the out in cutadapt documentation. There you can see that you can modify the error tolerance, minimum overlap between your adapter sequence and the read sequence, partial matches anywhere, or modify read names, using multiple adapters, etc.
Modifying reads
As trimmomatic, cutadapt also allows you to trimm and modify your reads based on quality, lenght, etc.
Quality trimming
Cutadapt allows you to adaptatively remove bases of low quality before the adapter removakl with the command -q threshold, threshold being the minimum quality value. Their algorithm then, cumulatively remove the bases if it does not pass the threshold (see the algorithm description here). It is similar to the sliding window in trimmomatic, but instead of computeing the average quality in the window as trimmomatic does, cutadapt extend the cut from one end until the span of bases crosses the threshold required. As an example, let’s imagine that we want a quality of more than 15, then your call would be cutadapt -q 15 -a AACCGGTT -o output.fastq input.fastq. This will essentially trim quality to a minimum of 15 in the 3’ end, and then remove the 3’ adapter AACCGGTT. If you would like to trimm both ends, you would need to provide two quality cut-off values: cutadapt -q 15,10 -o output.fastq input.fastq, in this case, input.fastq would be qualiy trimm on 15 in the 5’ and 10 on the 3’.
Removing bases and fixed length
Similar to the option CROP and HEADCROP in trimmomatic, the option --cut or -u can be used to remove bases from either end of the read. To cut bases from the 5’ end, you have to use positive numbers, while to cut from the 3’ end, you would use negative numbers: To remove the first 5 nucleotides you can typecutadapt -u 5 -o trimmed.fastq reads.fastq or to remove the last 7 nucleotide, you can type cutadapt -u -7 -o trimmed.fastq reads.fastq. If instead of a certain amount of bases before removing adapters you want a fix length for all reads after quality trimming and adapter removal you can use --length or -l. This will remove sequence from the 3’ end until all sequences have the specified length.
Filtering reads
By default, all reads whether they were trimmed or not, would be found in the output. However, you can modify this behaviour with some options (from their docs):
--minimum-length LENGTHor-m LENGTHDiscard processed reads that are shorter than LENGTH. Reads that are too short even before adapter removal are also discarded. Without this option, reads that have a length of zero (empty reads) are kept in the output.--too-short-output FILEInstead of discarding the reads that are too short according to-m, write them to FILE (in FASTA/FASTQ format).--maximum-length LENGTHor-M LENGTHDiscard processed reads that are longer than LENGTH. Reads that are too long even before adapter removal are also discarded.--too-long-output FILEInstead of discarding reads that are too long (according to-M), write them to FILE (in FASTA/FASTQ format).--untrimmed-output FILEWrite all reads without adapters to FILE (in FASTA/FASTQ format) instead of writing them to the regular output file.--discard-trimmedDiscard reads in which an adapter was found.--discard-untrimmedDiscard reads in which no adapter was found. This has the same effect as specifying--untrimmed-output /dev/null. The options--too-short-outputand--too-long-outputare applied first. This means, for example, that a read that is too long will never end up in the--untrimmed-outputfile when--too-long-outputwas given, no matter whether it was trimmed or not. The options--untrimmed-output,--discard-trimmedand-discard-untrimmedare mutually exclusive.
Trimming paired-end reads
YES! cutadapt also allows for pair-end (PE) read trimming. This is achieved by mixing some of the flags, and adding the paired flag -p pointing to the output for read 2:
cutadapt -a ADAPTER_FWD -A ADAPTER_REV -o out.1.fastq -p out.2.fastq reads.1.fastq reads.2.fastq
All filtering criterions we have seen can be applied to PE reads. By default, if any of the reads pairs should be filter out, both reads would be removed or redirected. To avoid this, you can use --pair-filter=both (as opposed to --pair-filter=any) in which case the filter must happen in both reads at the same time for the filter to be effective. Output options that we saw before, should be either accompanied or modified for their paired counter part: e.g --too-short-output/--too-short-paired-output.
From their docs:
These are the paired-end specific filtering and output options:
--minimum-length LENGTH1:LENGTH2or-m LENGTH1:LENGTH2When trimming paired-end reads, the minimum lengths for R1 and R2 can be specified separately by separating them with a colon (:). If the colon syntax is not used, the same minimum length applies to both reads, as discussed above. Also, one of the values can be omitted to impose no restrictions. For example, with-m 17:, the length of R1 must be at least 17, but the length of R2 is ignored.--maximum-length LENGTH1:LENGTH2or-M LENGTH1:LENGTH2Maximum lengths can also be specified separately, see the explanation of-mabove.--paired-output FILEor-p FILEWrite the second read of each processed pair to FILE (in FASTA/FASTQ format).--untrimmed-paired-output FILEUsed together with--untrimmed-output. The second read in a pair is written to this file when the processed pair was not trimmed.--too-short-paired-output FILEWrite the second read in a pair to this file if pair is too short. Use together with--too-short-output.--too-long-paired-output FILEWrite the second read in a pair to this file if pair is too long. Use together with--too-long-output.--pair-filter=(any|both)Which of the reads in a paired-end read have to match the filtering criterion in order for it to be filtered. Note that the option names can be abbreviated as long as it is clear which option is meant (unique prefix). For example, instead of--untrimmed-outputand--untrimmed-paired-output, you can write--untrimmed-oand--untrimmed-p.
Practice time
Now take the pair end reads we have been working with and:
- Remove primers
- Retain reads in the range of 100 to 200 bps
- Remove low quality tail and head
- Verify that indeed 1,2, and 3 worked.
Seqkit
There are different ways to process duplicates. Seqkit can not only remove duplicates, but manipulate sequences efficiently. I will not enter in details of Seqkit in this tutorial (expect a seqkit tutorial in the future), and will focus on one of the option: rmdup. This option can remove duplicates either by sequence or by name:
seqkit rmdup -s -o clean.fastq input.fastq: Remove duplicate sequences frominput.fastqand will save them inclean.fastqseqkit rmdup -n -o clean.fastq input.fastq: Same as before, but will only remove duplicate names.
One interesting feature of seqkit rmdup is that it gives you the option of having a report of the duplicates with the representative read associated with all the cluster of reads. It also allows for saving the duplicated reads in case you need them later or want to analyze them:
seqkit rmdup -s -i -m -o clean.fastq -d duplicated.fa.gz -D duplicated.detail.txt input.fastq
Try it on the data we have been working with, and check the report.


Leave a comment